

26 Oct How To Make MIL Eliminators
I recently acquired a bassani O/R X pipe and decided to do some research and learn how to make my own MIL Eliminators. Since the O2 bungs were located pretty far back on the bassani pipe, I would also have needed to buy O2 extension wires. The total cost for the MILs and the Extensions was going to be about $100, but I instead built my custom setup for only $20 in radio shack parts.
The parts/part numbers from radio shack that you will need are:
#2760148 – PC Board – 1 Package will do. You can break the board in half.
#2721434 – Tantalum Capacitor – You need 2 of these
#2711356 – This is a 5 pack of 1 mega ohm resistors. One pack is enough.
You will also need 20 gauge wire(25 ft. or so), electrical tape, solder, and a soldering iron. If you don’t have these items they can also be bought at radioshack.
You will need to remove your stock rear O2 sensors for this process.
Start by carefully cutting off the outer sheathing from the O2 sensor wiring. Once it is off you will notice that there are 4 different wires — A Gray wire, a Black Wire, and two White wires. You will want to mark one of the white wires because they will have to be matched up in their original configuration when everything is soldered back together.
Next cut through all 4 wire mid way between the connector and the O2 sensor. You will now have 2 separate pieces. Strip the end of all of the wires so that you have about a half inch exposed on each wire.
Cut 4 equal strips of 20 gauge wire and strip the ends of these as well( the length you need will depend on how much of an extension you need — each brand of midpipe mounts the O2 Bungs in different spots). I used about 2 1/2 feet for each wire.
You will now twist/solder these wires to the two halves of the O2 wiring harness so that it seems you have now just extended the wiring harness. Be sure to pay special attention to matching the wires up correctly. You wouldn’t want a black wire now connected to a different color.
Tape up each solder point so that the wires don’t touch each other. After each section is tapped you can then add another layer of tape around the entire area for extra strength.
The next step will be to cut the black and gray wire in the middle of the harness(the harness should now be about 3 feet long total and you will want to cut in the middle area so that you can tie wrap it up later away from hot exhaust areas).
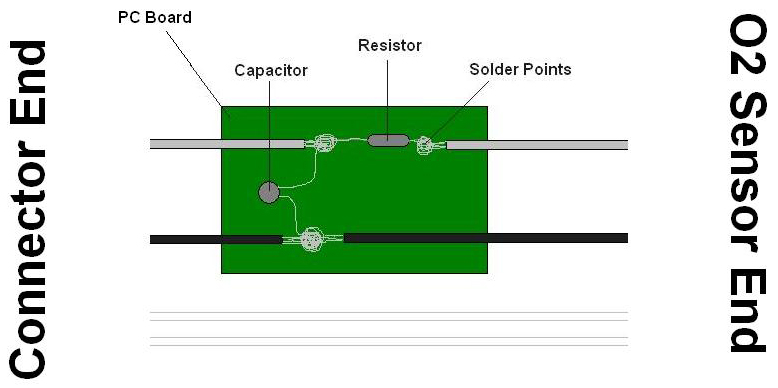
Go ahead and strip the wires in the same fashion as before and now you are going to follow the wiring diagram. Solder everything to the pc board as shown in the picture. Be sure to solder on the side of the board that has the little copper circles. The solder will hold everything tight to the copper area.
Be sure to pay attention to which end the Sensor is on and which the connector is on — IT DOES MATTER.
After everything is soldered up wrap the entire wire area of the harness with the electrical tape. Once all of the steps have been completed you should see the two ends(one the connector and the other the O2 sensors) with electrical tapped wire from end to end.
Undo your battery terminals so that the car has now power.
Screw the sensors back into the pipe and plug the connector ends back into the car.
After getting the sensors plugged back up about 5 minutes should have passed. Put the terminals back onto the battery and you are good to go.
I can’t absolutely positively promise you that this will work for your car, but it has for mine and was much cheaper than buying MIL’s/Extensions. It works exactly like MILs do so if you have followed the instructions and diagram you should be good to go and not have to look at an annoying check engine light.
found @ http://www.bmcforums.com
John
Posted at 10:31h, 8 August 2008Nice write-up
Thanks for the write-up. I made these MIL Eliminators following this write-up, and they work like a charm. Keep up the good work Mike!
T. J.
Posted at 10:03h, 5 December 2008These do work great. A friend and I built a set two years ago exactly like this and they solved me CEL. Cost 5 bucks or so. I didn’t use the board though, wanted to keep things nice and small. Anyone can do this with little to no skill and save money.
Bud
Posted at 20:41h, 15 May 200908 mustang
Will these work on my car becuse i cant find any for it?
Mike
Posted at 21:32h, 15 May 2009It should.
Brian
Posted at 19:00h, 30 June 20092?
You need to make 1 for each side correct? By the way nice write up!
Eddie
Posted at 21:19h, 6 July 20172006 Ford E250 4.6L
I tried this for my van and it has not worked. Any idea on what I might try next? I did not use the board. The positive side of the Cap went to the black wire.
Chris
Posted at 02:47h, 4 July 2009Would this work on my 1997 Ford F-150 4.6 V-8?
Mike
Posted at 00:13h, 18 August 2009It should
Yes it should, I would imagine at least.
adam
Posted at 07:00h, 29 September 2010if i did this could i gut out my cat and not have my check engine light come on
Mike
Posted at 09:24h, 29 September 2010Yes, these will prevent your check engine or SES light from coming on.
bill
Posted at 13:33h, 3 October 2010This worked on my 09 f150. Didn’t use the board though. Wanted to keep it small. Thanks for the help.
Ahmet
Posted at 18:11h, 14 August 2013MIL question
Dude. I have no idea if you still get messages. When you made your MIL eliminator for your 09 F150. Did you use the 1/2watt resistor. Or made it just like mike did it?
Logan
Posted at 15:50h, 23 February 2011Will this work on my 96 F150 5.8 liter?
BHUGHES
Posted at 20:13h, 17 March 2011this worked for my 2001 Mustang GT …and it only cost about $10…
Jonathan
Posted at 16:06h, 6 May 2011Capacitor
There is a long wire and a short wire coming from the capacitor. In the diagram it looks like the long one attaches to the resistor side of things. Is this correct or does it not matter?
dave
Posted at 13:29h, 12 May 2011Wiring
Hey just like the first post, the capacitor has short and long wire. Is the long side connected to the resistor side? Please confirm.
Richard
Posted at 11:40h, 4 January 2012Capacitor
the capacitor does not have polarity no matter wich one filament
Derek
Posted at 19:09h, 21 September 2011what about?
what if the rear oxygen sensor is missing like the wires were just cut off at the sensor is there a way to make this still work?
omar
Posted at 18:45h, 29 October 2011thank you
they worked on my 02 mustang gt, no MIL and all monitors checked in after a long cruise beats spending 80 dollars.
ed
Posted at 13:55h, 1 April 2012this works however the black wire is the + and the gray wire is the -. wire the capacitor and the resistor on the positive wire not the gray wire
Lumpy
Posted at 02:12h, 13 June 2012Will this work on a 98 Ranger with 2.5L 4cyl?
Allan03GT Tn
Posted at 18:48h, 23 December 2012mil eliminators
I have built 3 sets of these and none have worked
I am building them just like the photo and the lights keeps coming back on. Should I reverse the black and gray wires? This is on a 03 gt convertible
Rafael
Posted at 03:08h, 28 January 2013Yes
Yes you should.
vinny
Posted at 01:17h, 24 March 2013I made 3 sets and it didnt work also i had to use the 1/2 watt resistor the 1/4 didnt work.
Rafael
Posted at 02:56h, 28 January 2013I’ve got a 00′ V6 manual transmission, 94-98 headers.
I gutted my Cats and needed these mil eliminators.
But i only got 104 capacitors.
The P0420 code disappeared and hasn’t come back since but the P0430 is still lingering.
I’m changing the capacitor and resistor once again, but my doubt is:
Is a 104 (.1uF Capacitor) the problem? Should I get the 105 (1uF capacitor).
Plus, I’ve got a 4.7uF(50v) Capacitor lingering around, would that do the trick too? Or could I cause more trouble?
shawn
Posted at 17:33h, 24 May 2013Re: MIL Eliminators
I used this article to make my own MIL’s. I did not need to extend the wires so I just cut the Black and Gray wires and soldered in the resister and capacitors.shrink wrapped and taped.
I did not used the pc board either.
I did this on my 1999 SVT Lightning and it worked great. No more codes for catalyst system.
The MIL’s you buy for mustangs/ford are pretty much universal. The 02 sensor wires on my Lightning were Identical.
Thanks for sharing! Saved me 32 dollars.
I spent 18 dollars total Including the Solder and Shrink Wrap
El peluche
Posted at 16:50h, 28 July 2013Land Rover Discovery 2 with a 4.6 Bosh V8
Hi there Guy’s.. Do u think this also can work on my land rover??? I just did the throttle body groove and now the engine is dumping more gas to keep my exhaust temp up. So i’m not getting much of the gains from the up grade. Just like 2% increase on fuel economy
Ahmet
Posted at 18:13h, 14 August 2013Newer Fords
For newer Mustangs ie 2005+ 4.6 Do we have to use 1/2 watt resistors? I’m getting the code “Rear O2 Stuck Lean”
Lance
Posted at 06:53h, 5 September 2013Ford V8 in Jaguars
I have the Ford V8 Dual Overhead Cam 4.0 Liter. I think its the same engine found in early Lincoln LS Sports Sedans (though they call it a 3.9).
I have No Cats, replaced front mufflers with cylinder performance mufflers, and 18″x3″ Resonator tips — Will this fix work for me, and should I use 1/2 or the 1/4 resistor .. ?
Thanx Guys .. !
Hector
Posted at 17:11h, 4 December 2013Just made a set of these, already had wire. Cost me about 6$ for the parts. Ill be back and post how they worked.
Mike
Posted at 11:31h, 6 December 2013Re:
Good luck. Post up a picture here when you get around to it!
Fritz
Posted at 17:02h, 31 January 2014Capacitor
Long end of capacitor is + and short end is -.
So long end goes to blk wire and short to grey.
This will hopefully clarify for those still getting error codes.
Fernando
Posted at 21:51h, 17 February 2015MIL Eliminator
Hello, Just wondering if this worked on the post about the 05+ 4.6L?
Thanks
Eddie
Posted at 21:15h, 6 July 20172006 Ford E250 4.6L
I made these and it did not work on mine. The MIL came back in within a few minutes. I wire the positive side of the cap to the black wire. Any ideas why this did not work?
Ralph
Posted at 21:26h, 17 July 2017mils
Didn’t work for me either. I gave up after trying several methods. Ended up just pulling the MIL bulb out of the cluster. Car is sold now.
Bob
Posted at 03:18h, 13 January 2018I made the same thing
I used the same design on a subaru. So far it working great. It stopped the fuel trim from bouncing all over, as the ecu was trying to fine tune it the mixture with a high flow cat it never could figure it out. Soon as I put this mod on the front O2 and fuel time went to rock steady.
Chris
Posted at 16:43h, 8 June 2018M i l eliminators
I have a 2011 Mustang GT 5.0 stainless steel headers no catalytic converters my issue is check engine light comes on due to the back to O2 sensors sends a code where can I get and what is the part number the eliminators for this coyote motor
Angel
Posted at 03:27h, 6 October 2018Need help please
Rob roy
Posted at 21:15h, 24 August 2020Will these mil eliminators work for the 2011 coyote engines as well or is there enough new technology in the ecm to know when something is not exactly the way it was from the factory. Thank you for your response and greatly appreciate your knowledge