|
|
||||||||||||
|
|
|
Westchester Web Design |
REMOVING THE FACTORY SHIFTER
Note: this install is shown on my 1997 Cobra. Fox owners will have more work involved with accessing the shifter bolts due to console interference. You can grind the console away for bolt clearance with a dremel tool or something similar, or you might remove the console entirely. '86 & earlier owners will be removing the console for sure.
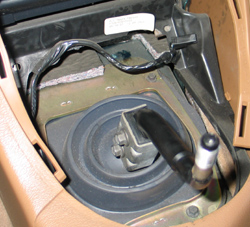 1.
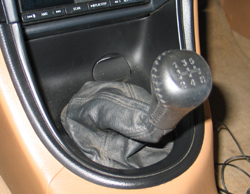
Unscrew the shift knob and remove the shift boot and console cover
plate assembly. (Push your fingers into the boot, hook your fingers
under console plate and lift up).
1.
Unscrew the shift knob and remove the shift boot and console cover
plate assembly. (Push your fingers into the boot, hook your fingers
under console plate and lift up).
2. Remove the factory shift handle with a 10mm wrench.
3. Remove the four bolts (8mm) holding the inner rubber shift boot plate and remove the boot.
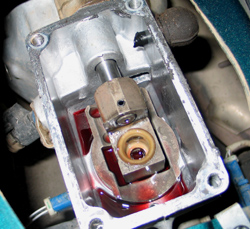
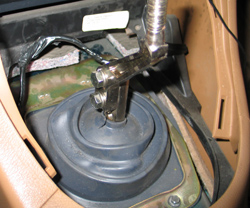
 Here
is a closeup of the main reason the factory shifter feels rubbery; the
handle is isolated in rubber (imagine that!). This keeps the shifer
handle quiet & gives the trans a smooth feeling while shifting, but
is not the best way to a direct connection while changing gear ratios,
especially during the heat of battle.
Here
is a closeup of the main reason the factory shifter feels rubbery; the
handle is isolated in rubber (imagine that!). This keeps the shifer
handle quiet & gives the trans a smooth feeling while shifting, but
is not the best way to a direct connection while changing gear ratios,
especially during the heat of battle.
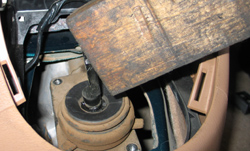
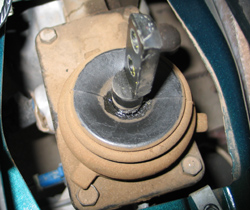 My '97 Cobra has only a few ticks over 50,000 miles, but man, does the grime accumulate.
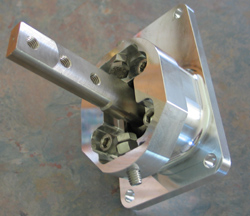
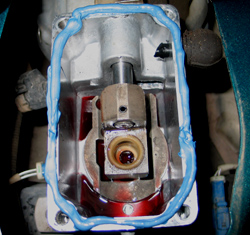
 4. Remove the four bolts (13mm) holding the factory shifter to the transmission.
Remove the shifter from the transmission. You may have to pry the
shifter from the transmission because the adhesive sealant bonds the
shifter to it. A quick blow to the base (not lever) with a block of
wood will break the shifter free without damaging it.
4. Remove the four bolts (13mm) holding the factory shifter to the transmission.
Remove the shifter from the transmission. You may have to pry the
shifter from the transmission because the adhesive sealant bonds the
shifter to it. A quick blow to the base (not lever) with a block of
wood will break the shifter free without damaging it.
**YES, I whack the shifter lever with my block of wood & hammer. Always have, always will, never had a problem. If you do, & you break something, you're on your own!**
 5.
Make sure the plastic bushing is still in the transmission where the
shift lever moves the gear selector. If it is not there, look for on
the end of the shifter, as sometimes it comes out still attached to the
lever.
5.
Make sure the plastic bushing is still in the transmission where the
shift lever moves the gear selector. If it is not there, look for on
the end of the shifter, as sometimes it comes out still attached to the
lever.
 6. Scrape any remaining gasket material off the transmission and clean off any oil or dirt.
7. Make sure the plastic bushing is still in the transmission (see step 5).
8. Apply a bead of silicone gasket maker to the transmission mounting surface.
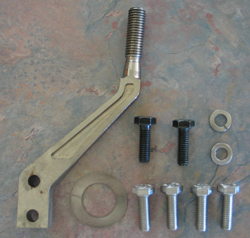
9. Install the new shifter using the new bolts provided (8mm x 1.25
x 20mm long stainless steel). Don??t reuse the factory bolts, they are
too short for the new shifter.
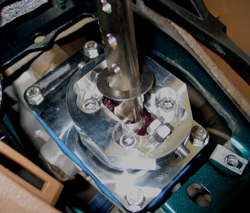 10. SET THE SHIFTER STOPS as follows:
a) Back off the stop bolts so that the shifter moves freely into all gears
b) Place the shifter in first gear and thread the stop bolt towards the shift lever by hand until it contacts the shift lever.
c)
Once the stop bolt contacts the shift lever, back off the bolt 1/4 to
1/2 turn, until there is a small air gap (about .015") between the
shift lever and the stop.
d) Hold the bolt with a 1/2" wrench while tightening the jam nut against the shifter tower with another wrench.
e)
Double check the space between the shift lever and the stop bolt. When
you pull hard on the shift lever it should contact the stop bolt, but
when you let go of the lever it should not touch the bolt, but have a
small air gap between them.
f) Place the shifter in second gear and adjust the other stop bolt.
g)
Shift the shifter through all gears and double check the stop clearance
in each gear. The shifter must be able to shift freely into all gears
and rest in gear without interference from the stop bolts.
 11.
Place the BootGuard washer over the shift lever. (The large washer
slips over the top of the lever and slides down until it sits on the
step in the lever.)
11.
Place the BootGuard washer over the shift lever. (The large washer
slips over the top of the lever and slides down until it sits on the
step in the lever.)
12. Place the inner shift boot over the shift lever until it rests on the BootGuard. (This is the rubber boot which bolts to the transmission tunnel, not the rubber boot which was attached to the factory shifter.) Reinstall the inner boot with the four factory bolts.
13. Install the new shift handle at the desired position with the two bolts (8mm x 25mm long) and lock washers provided. Tighten bolts securely with a wrench. It is recommended that the handle be installed in the higher position for the greatest driver comfort. For the shortest throw, install the handle in the lower position.
**I gotta tell ya, I initially set it up for the shorter throws. I
can take it, I figured. I'm hard core. I installed the shifter on a
Sunday afternoon; during my lunch break on Monday, I was out in the
parking lot, moving that sucker up to the higher position. Like I said,
hard core.**
 14. Install the console cover plate, shift boot and knob.
**Important: Always use an anti-seize compound on the threads if installing an aluminum shift knob. (I'm in Arizona; the last thing I need is a metal shift knob. Besides, the factory Cobra knob rocks.)**
There we go, all done! It took maybe an hour, & makes a world of difference in the way the car feels. I'm looking forward to not lifting off the gas during upshifts on my next trip to the track! ;)